Multi Stage Docker Build 🐳
Posted in Docker on November 4, 2024 by Kalyankumar Vinayakabaskaran ‐ 3 min read

Optimizing Docker Images with Multi-Stage Builds
Building Docker images is an essential skill for developers aiming to deploy applications seamlessly. However, the size and efficiency of Docker images can vary greatly. Multi-stage builds are a powerful feature that allows us to create smaller and more efficient Docker images by using multiple FROM statements in a single Dockerfile. In this article, we’ll explore what multi-stage builds are, why they are beneficial, and how to implement them with a practical example.
Multi-Stage Builds
Multi-stage builds in Docker allow you to use multiple base images in a single Dockerfile. This technique lets you compartmentalize different stages of your build process. For instance, you can use one stage to compile your application and another to package it into a minimal runtime environment. The result is a smaller, more secure Docker image that contains only what is necessary to run your application.
Benefits of Multi-Stage Builds
- Reduced Image Size: By copying only the necessary artifacts from one stage to another, you can significantly reduce the size of your final image.
- Improved Security: Smaller images with fewer components reduce the attack surface.
- Simplified Dockerfiles: Breaking down the build process into stages can make Dockerfiles easier to read and maintain.
- Resource Efficiency: By separating the build environment from the runtime environment, you can ensure that your final image is lean and only includes production dependencies.
A Practical Example: Building a Node.js Application
A Normal Dockerfile
# Use the official Node.js 22 image as the base
FROM node:22

# Set the working directory inside the container
WORKDIR /app

# Copy package.json and package-lock.json to the working directory
COPY package.json ./

# Install dependencies using npm
RUN npm install

# Copy the rest of the application code to the working directory
COPY . .

# Build the NestJS application
RUN npm run build

# Expose the port your app runs on
EXPOSE 4000

# Command to run your application
CMD ["node", "dist/main"]
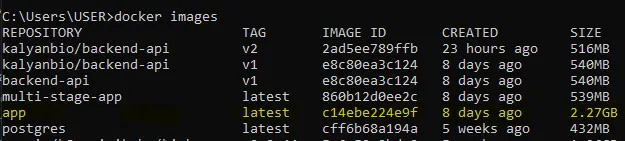
This is a normal Dockerfile., The below image shows the size of the image using normal build.
Next, we’ll create a Dockerfile to build and run our application using multi-stage builds.
# Stage 1: Build stage
FROM node:22 AS build

# Set the working directory inside the container
WORKDIR /app

# Copy package.json and package-lock.json to the working directory
COPY package.json ./

# Install dependencies using npm
RUN npm install

# Copy the rest of the application code to the working directory
COPY . .

# Build the NestJS application
RUN npm run build

# Stage 2: Production-ready stage
FROM node:22-slim

# Set the working directory inside the container
WORKDIR /app

# Copy built artifacts from the previous stage
COPY --from=build /app/dist ./dist
COPY --from=build /app/node_modules ./node_modules
COPY --from=build /app/package.json ./package.json

# Expose the port your app runs on
EXPOSE 4000

# Command to run your application
CMD ["node", "dist/main"]
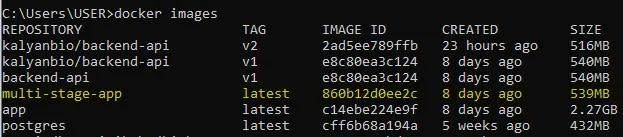
The below image, shows the docker image detail, which we build from multi-stage-build docker file. You can clearly able to see the size difference.
Conclusion
Multi-stage builds are an excellent way to optimize your Docker images. By separating the build environment from the runtime environment, you can create smaller, more secure, and efficient images. This technique is especially useful for applications that require a build step, such as those written in compiled languages or those that use a bundler like Webpack.
By adopting multi-stage builds, you can improve your development workflow and ensure that your production images are as slim and efficient as possible. Give it a try in your next project and experience the benefits firsthand!

